Google Merchant Center is the unsung hero of online advertising. Many marketers use it, but few of them mention it when discussing their marketing strategies. Don’t be fooled, though. Google Merchant Center is the absolute backbone of every successful Google Shopping campaign.
But what is it exactly and how does it work? And what benefits can you expect after setting up your own account?
In this article, we’ll guide you through how to set up your account and get started. We’ll also provide some handy tips for optimizing different aspects of this powerful tool so you get the most from it for your online business.
What is Google Merchant Center?
Google Merchant Center was launched in 2010 together with Google Shopping. It is a digital platform that allows you to create Shopping ads for Google, YouTube, and other Google partner sites.
The main purpose of it is to allow merchants to upload and update information about their products. This product information includes pricing and availability. The updated data is displayed in relevant Google Shopping ads and search queries.
Why should I use Google Merchant Center?
Here are some specific features that make it especially valuable.
1. Importing customized product data sheets.
Google Merchant Center offers a wide array of descriptors (or attributes) for your product data. This gives you plenty of scope for customization when it comes to creating Shopping ads. It can also be incredibly helpful when you need to find a specific product, or to adjust your strategy for different products dependent on performance.
2. Editing and updating existing product data.
You can easily edit product data. This allows you to optimize products that are still running on the Shopping Feed. In addition, Google Merchant Center allows you to tinker with bids and manage your advertising strategy practically in real time.
3. Smooth integration with other Google products.
The center naturally integrates with Google Ads, the Google Display Network, and other advertising platforms. This means you can run sophisticated remarketing and omnichannel advertising campaigns.
Being on Google Merchant Center will ensure your marketing on Google is more coordinated, and that customers see the most relevant and up-to-date product information for your e-commerce store.
Does Google Merchant Center cost anything?
Using the Google Merchant Center is completely free. Just don’t forget you’ll still need to pay for user engagement. This can be done in a couple of different ways:
- Cost per click (CPC). With this method, you pay a certain amount of money every time a potential buyer clicks on one of your ads.
- Cost per engagement (CPE). With CPE, you are charged every time a user “engages” with an ad. This includes expanding a collapsed ad, view an ad for more than 10 seconds, scrolling an ad, and tapping on an ad.
How do I set up a Google Merchant Account?
Setting up a Google Merchant Account account is easy as pie. Just follow the 5 steps below.
Just one quick point before we get started. To set up a Google Merchant Center account, you’re going to need an existing Google account. This could be a Gmail or Google My Business account. If you don’t have one, you’ll need to create one before following these steps.
Step 1
Go to the sign-up form for the Google Merchant Center and click on the blue rectangular button that says “Create your account”.

Step 2
In the next window, click on the blue button titled “Get Started”.

Step 3
Next, fill in all the required information about your business, including name and country. You can also specify the tools you’ll be using, such as Shopify or PayPal (more on this later in the blog).

Once you’re done, have a look at the Terms & Conditions and check the box nearby to indicate your agreement. Then click on the blue rectangular button that says “Create Account”.
Step 4
Almost there! Your account is ready to use, so go ahead and click on “Continue”.

Your account is live
Just like that, you’re now the proud owner of your very own Google Merchant Center account. Now it’s time to start using it!

Linking Google Merchant Center to Google Ads
The first thing you should do now that you have your account set up is to link it to Google Ads. This way, all the product information you include or update in Merchant Center will automatically be synced with your Google Ads account.
How do I link with Google Ads?
- First, click on the gear icon at the top of the screen and select “Linked accounts”.
- Next, add your Google Ads account by entering your Customer ID, which is displayed at the top of the screen.
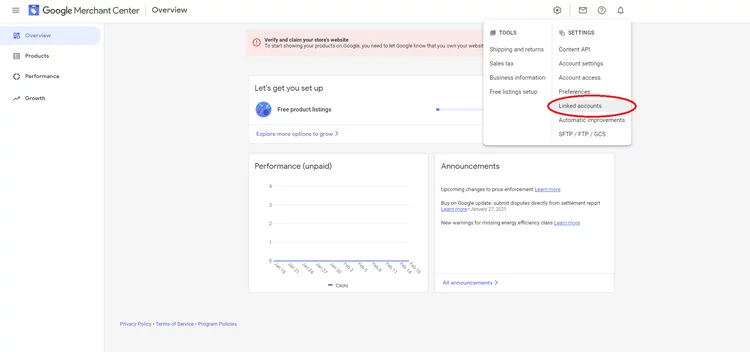
- You may also need to approve the link from your Google Ads account. This is easy to do - just click on “Tools and settings” > “Linked accounts” > “Google Merchant Center” > “View details” > “Approve”.
And that’s it. You can now feed your product data into your search campaigns and product listing ads.
If you want to diversify your campaign management, you can also link your Google Merchant Center account with several different Google Ads Customer IDs. Just repeat the steps above for each Customer ID you want to add.
How do I add products to Google Merchant Center?
It’s time to take a look at the single most important skill you’ll need to master with the Google Merchant Center - adding products. We’ll go in depth on 3 important parts of this process:
- Adding a product data sheet
- Filling in a product data sheet
- Making changes to the feed
Let’s get started.
Adding a product data sheet
One of the key advantages of the Google Merchant Center is that you can customize the product feed in many different ways. This is all possible thanks to spreadsheets.
Google Merchant Center allows you to use your own XML and TXT files. But in this guide we’ll be using Google Sheets. Why? They’re less complicated to use and allow for more granular control over the feed.
So, here’s how you add a product data sheet using Google Sheets
- First, go to “Products” in the dashboard and select “Feeds”.
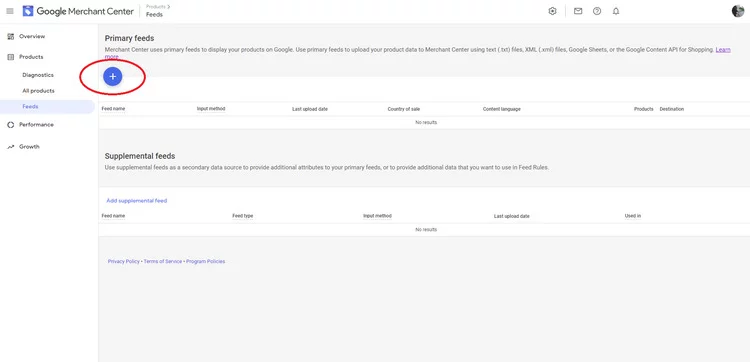
- First, you’ll need to specify the country you want to sell your products in and your language of choice.
- Then select “Google Sheets” in the next window (the first option from the top) and give your product feed a name.
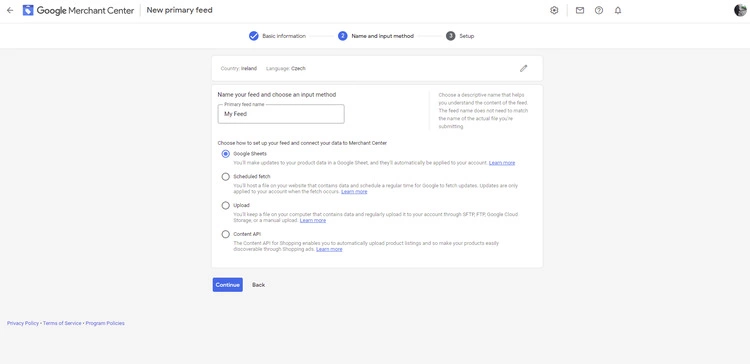
- Finally, select “Generate a new Google spreadsheet from a template” and click on “Create feed”.
You’ll be taken back to the “Feeds” section of the Google Merchant Center dashboard where you’ll now be able to see your newly created Google Sheet. To edit the sheet, simply click on “Open” right under “Google Sheets”.
Simple enough? Great! Now let’s take a look at the sheets themself, and what makes them so important for e-commerce success.
Filling in the product data sheet
When you open up the spreadsheet template, this is what you’ll see:
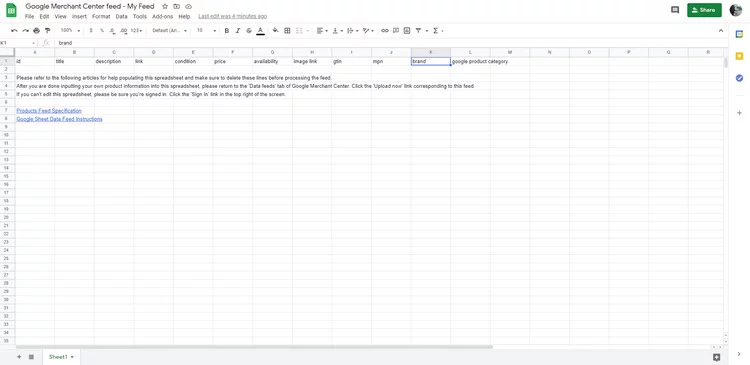
First, simply fill in the given fields (Id, title, description etc.) to the best of your ability. If you’re unsure about any of the fields, go ahead and take a look at the Google Merchant Center product data specification guidelines. These provide a fairly comprehensive overview of each attribute, including some useful examples.
It’s OK if you don’t have detailed information for every field. But remember that the more product information you can provide, the better. More data on your products will mean:
- You have a wider range of possibilities for making highly customized, effective Google Shopping ads;
- It’s easier to look up products for editing/adjustment;
- It’s easier to find ads that provide users with the information they need.
Once you’re done, go over the entire sheet at least once and make sure that you didn’t leave any empty fields. This will save you the headache of spending hours looking for a specific product by one of its attributes, only to realize that you’d left the corresponding field empty by mistake.
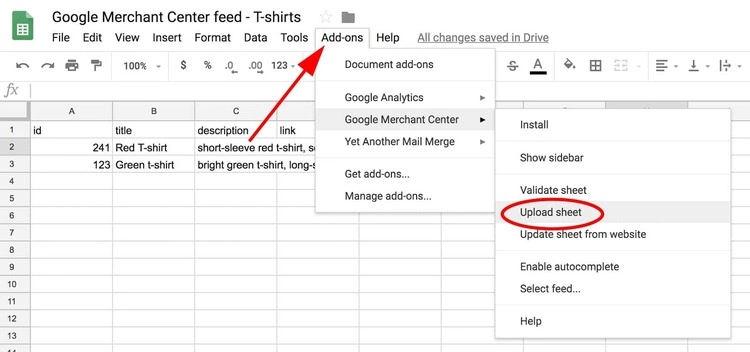
When you’re ready to import your data, go to “Add-ons” in the Google Sheet menu, select “Google Merchant Center” in the drop-down menu, and click on “Upload sheet”.
Making changes to the product information
If you need to make some changes to your feed (i.e., the product inventory), you don’t have to fill in and upload a brand new sheet every time. Google Merchant Center allows you to use “supplemental feeds” which make it possible to add new information to already existing shopping feeds.
Here’s how you make changes to product information.
- Go to “Supplemental feeds” in the “Feeds” section and click on “Add supplemental feed”.
- Follow the prompts and provide the required information. This includes a name for the supplemental feed, an input method, which primary feed you want to link to, and a scheduled fetch for your product data (this way you won’t have to upload it manually).
Tips to optimize your use of Google Merchant Center
Phew. We’re done with the basics and ready to jump into some nifty tips and tricks for squeezing the most value out of the Google Merchant Center.
You don’t need to do every single one of these. But don’t forget – at risk of sounding like a broken record – the more quality product information you can provide, the more you’ll get out of the Google Merchant Center.
#1 Extend the list of attributes
Despite your Google Sheet having a certain number of pre-set attributes (id, title, description, price, etc.), you are by no means limited to them. Depending on the ads you’re running, you might want to consider adding additional columns.
Think about what your potential customers might like to know about a specific product or product group. You can add columns like “age range”, “size”, “material”, and so on.
You can even include some of the more important attributes directly in the title column. This way, your potential customers will be able to see a lot of the key info even before they click on the ad.
Just don’t go too crazy with the level of detail – you want to give users enough information to keep them engaged, but not so much that it gets overwhelming.
#2 Make it scalable
This might seem obvious, but arranging your sheets in a way that allows you to scale upwards without any trouble is more than worth the trouble.
For this reason, it’s best to organize and clean up your sheets before importing them to Google Merchant Center. This will make it much easier to scale your product feed whenever that becomes necessary.
#3 Add GTINs across the board
GTINs (Global Trade Item Numbers) must be specified for all Google Shopping products, otherwise you may run into some errors in your Google Merchant Center account. In most cases, GTINs are located next to the barcode of the product packaging.
Some products, such as vintage or antique goods, custom-made products, or books released before the ISBN system, may not have an associated GTIN.
If that’s the case, make sure that all your products include the “brand” and “mpn” fields from the Google data specification guidelines.
The takeaways
Hopefully, you’ve found all that you needed in this article to get you with Google Merchant Center. This is a valuable tool that will help your customers find more information about your products. Plus, they will find it more quickly and in more places.
The key to success with Google Merchant Center is to take time to optimize your use of it. And, as we keep repeating, add as much high quality data about your products as you can.
Once you have it set up, a smart next step is to learn more about Google Shopping ads. As this article on the benefits of Google Shopping ads explains, this ad format is outpacing standard text ads.


