Want to know how to create a Facebook Custom Audience? Here you will learn how to create 12 of them!
Yes, really – 12! But don’t worry, the mechanics are pretty much the same for all Custom Audiences. The key is to understand when to create which one so you’d get as many sales as possible from your Facebook ads.
In this guide, we explain:
- What a Custom Audience is
- What are the main types of Custom Audiences, and how to create them
- Give examples of the best Custom Audiences you can create
We also provide a few more useful tips to help you bring your Facebook targeting to the next level.
Let’s learn how to make some money!
What is a Facebook Custom Audience?
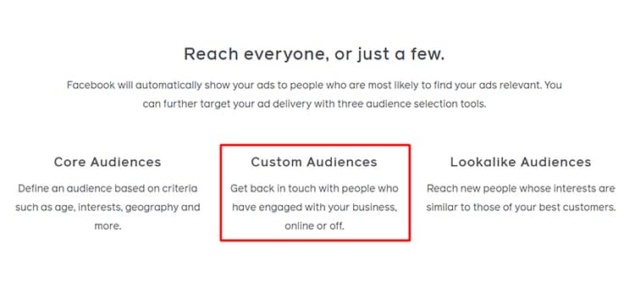
You can create three main types of audiences on your Facebook’s Ad Manager:
- Core Audiences – based on interests and demographic criteria;
- Custom Audiences – based on people who have engaged with your business;
- Lookalike Audiences – based on people similar to your best customers.
Today, we’re talking about everything you need to know to create well-performing Custom Audiences.
Custom Audiences let you reconnect with people who have interacted with your business, be it online or offline. It’s one of the most effective forms of targeting since you get in front of people who are already interested in your products or services.
You can base these audiences on your website or app traffic, customer lists, or engagement with your business across the Facebook family apps and services.
Once you create a Custom Audience, Facebook will find relevant people to show your ads in their news feeds, stories, or any other placements you choose.
You can use Custom Audiences for two main purposes:
- To retarget people;
- Use as a source for Lookalike Audiences.
With Custom Audiences, you can reach highly targeted people and maximize your return on investment (ROI). Or, to put it more simply, get the most of your ad budget.
5 Types of custom audiences
Before we get into the specifics of creating Facebook Custom Audiences, let’s have a quick look at what types you can choose from.
1. Customer List Custom Audience
You can create a Custom Audience based on the information from your CRM system or email lists. Once you upload a list, Facebook matches the hashed information with the corresponding Facebook profiles (information is turned into anonymized code before it reaches Facebook).
This allows you to connect with our existing customers on Facebook and encourage them to make a repeat purchase. The more information you can provide, the more matches you’ll get.
Keep in mind that Facebook can’t learn any new identifying information about your customers.
2. Website visitors Custom Audiences
These audiences are based on your website visitors. The Facebook pixel matches people who visited your online store with people on Facebook and lets you target them with your ads.
For example, you can create a Custom Audience based on people who visited a particular product page on your website but didn’t buy anything. You can run a personalized ad campaign with the product they were interested in to encourage them to make a purchase.
Or you can target all people who visited your website in the last 30 days. You can give them an incentive, such as a discount, to go back to your store and buy something from you.
NOTE: To create custom audiences based on your website visitors, you need to have your Facebook pixel enabled.
3. App activity Custom Audience
If you have an app for your business, you can also create Custom Audiences based on people who have interacted with your app. For example, you can reach people who added something to a cart within your app but didn’t go through with the purchase.
NOTE: You’ll need to install the Facebook SDK to pass app event data to Facebook. This might be a bit technical, so it’s better to consult with a programmer or a paid advertising specialist beforehand.
4. Engagement Custom Audiences
It’s a Custom Audience made up of people who have interacted with your content through Facebook’s apps and services. You can target users who have liked your posts, opened your lead form, or watched your videos.
There are eight engagement types available:
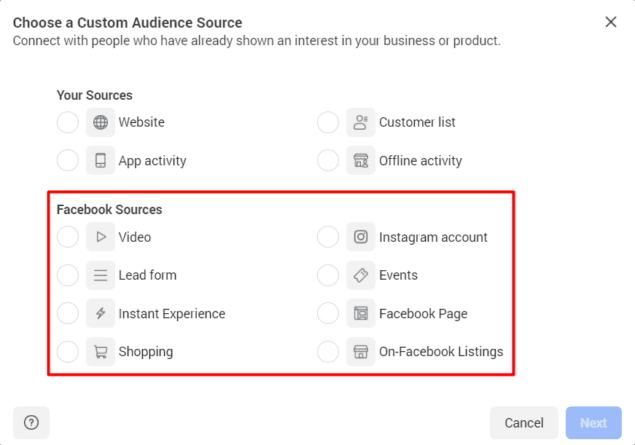
- Video: target people who watched your video on Facebook or Instagram.
- Lead form: target people who opened your lead form.
- Instant Experience: target people who have engaged with your Instant Experience ads (formerly known as Canvas).
- Shopping: target people who have interacted with your Facebook and/or Instagram shop.
- Instagram account: target people who have engaged with your business on Instagram.
- Events: target people who showed interest in your Facebook events (upcoming or past).
- Facebook Page: target people who have engaged with your Facebook page.
- On-Facebook Listings: target people who showed interest in your products on the Facebook Marketplace.
NOTE: Engagement Custom Audiences are constantly refreshed, which means you don’t need to edit or create a new Engagement Custom Audience (unless you want to change the type of engagement or the time period).
5. Offline Activity Custom Audiences
If you have an actual brick-and-mortar store, this Custom Audience is a must for you. It’s made of people who interacted with your business at your store, over the phone, or by other offline channels. You’ll have to upload the data from your physical store to the Events Manager.
How to create a Facebook Custom Audience
Now, let’s see how you can create a Custom Audience for each type available.
1. Create a Customer List Custom Audience

If you already have customers, this is a must-have Custom Audience for you! You can build it based on your customers who provided their contact information, such as email or phone number.
Here’s the step-by-step process.
- Go to “Audiences” on your Ads Manager and click on “Create Audience”
- Choose “Custom Audience”
- Choose “Customer list”
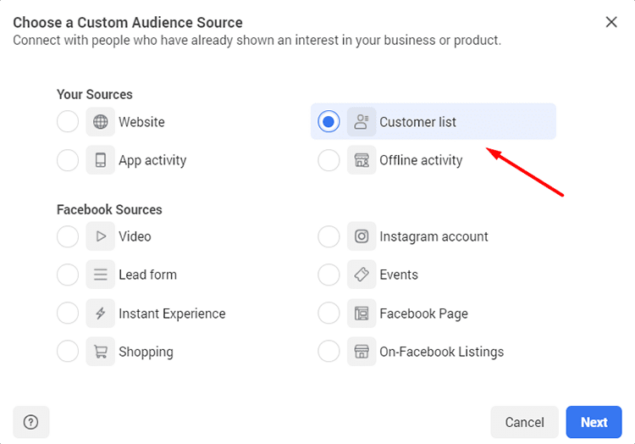
- Prepare your Customer List
You can either import your customer list from Mailchimp (if you’re using it) or manually import a CSV or TXT file.
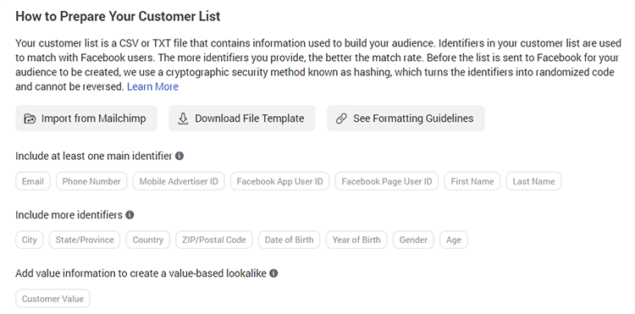
When uploading your customer information manually, you’ll need to format it according to Facebook’s requirements.
Here are the key things to know:
- To get the best match rates, include as much information as possible (email, address, phone number). This information is called “identifiers.”
- Once you have the information, format your customer information into a CSV or TXTfile. Check Facebook’s guidelines on how to do it here.
- Organize your customer information into separate columns if you have several identifier types.
- Always include the country code of the phone numbers on your customer list, even if they all are from the same country.
- If you’re using a country as your “identifier,” make sure you have a separate column for it, even if all your customer data is from the same country.
To make formatting easier, click on “Download File Template” – it’s provided by Facebook and has all the columns and identifiers in place.
Once you’re done preparing your Customer List, click Next.
- Select List Type
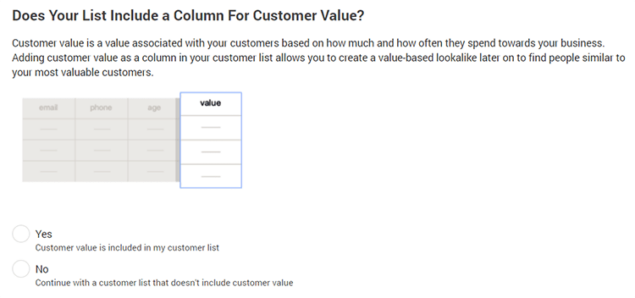
You’ll be prompted to tell if your list includes a column for a customer value. It’s a number that indicates how important a specific customer is to you. You can skip it, but you won’t be able to make use of value-based Lookalike Audiences in that case. These audiences are made of people who are most similar to your highest value customers.
- Add Customer List
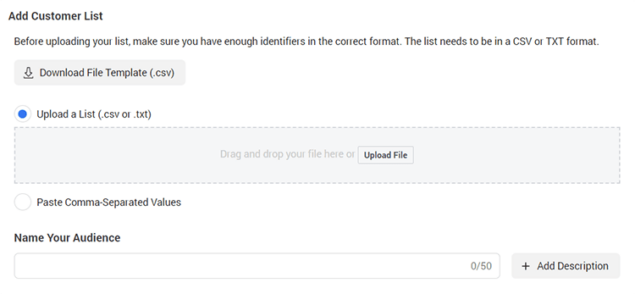
Now, upload your list, name your audience, and add a description to remind yourself of who you’re targeting with this audience.
If you’re using a value column, Facebook will ask you to identify it.

- Map Identifiers
Facebook will ask you to double-check if your data has been mapped with the correct identifiers (are emails identified as emails) and correct any mistakes if needed.
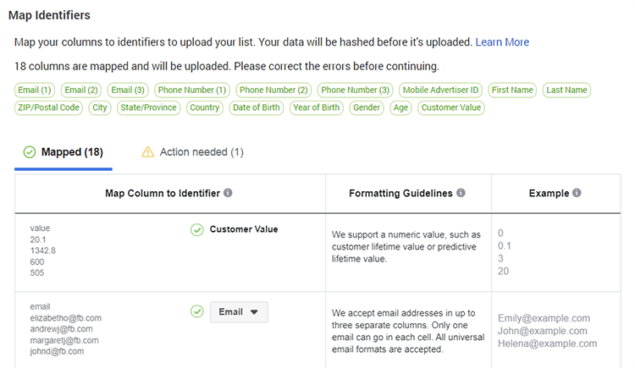
Once you’re done checking your data, click on Import & Create at the bottom right corner. You’re done!
2. Create a Website Custom Audience
It’s a Custom Audience that allows you to target people who visited your website. Chances are, it will be one of your most-used audiences.
Here’s the step-by-step process of how to create it.
- Go to “Audiences” on your Ads Manager and click on “Create Audience”
- Choose “Custom Audience”
- Choose “Website”
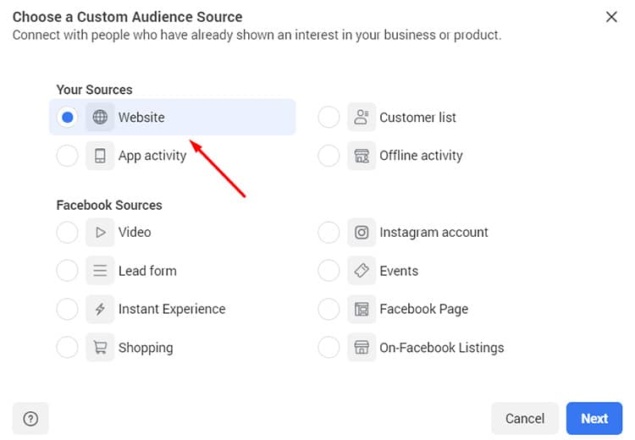
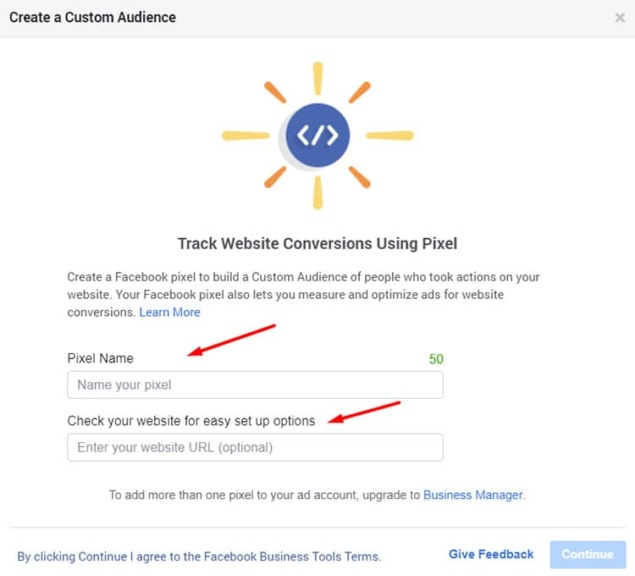
- Set up a Facebook pixel for your website
The Facebook pixel is a code that lets Facebook gather information about your website visitors so you could retarget them with ads on Facebook.
Facebook will guide you through the process of creating your Facebook pixel.
- Set up your Custom Audience
Here, you’ll have to choose who you want to include in your audience.
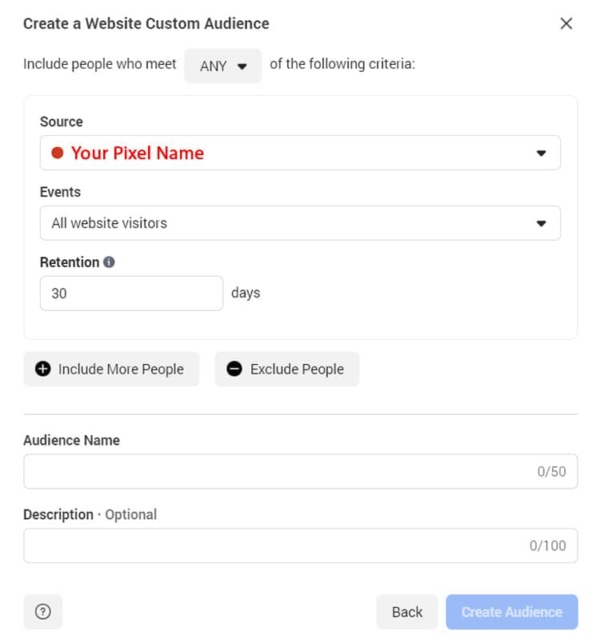
Click on “Events” and choose one of the three options available.
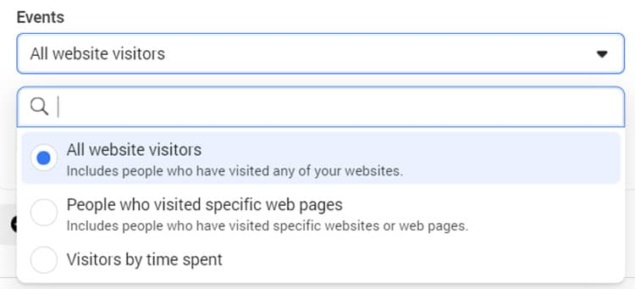
You can choose from:
- All website visitors
- People who visited specific web pages
- Visitors by time spent
Once you’re done, click on “Create Audience.”
3. Create an App Activity Custom Audience
It’s a Custom Audience that lets you target people who took a specific action on your app, such as bought something or simply opened it.
Here’s the step-by-step process of how to create an App Activity Custom Audience.
- Go to “Audiences” on your Ads Manager and click on “Create Audience”
- Choose “Custom Audience”
- Choose “App Activity”
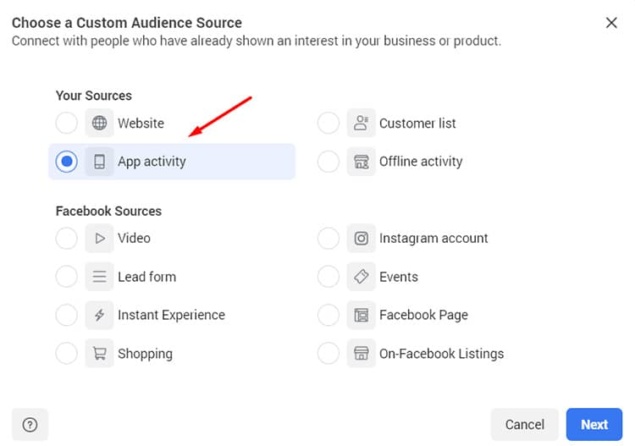
Fill in the details below:
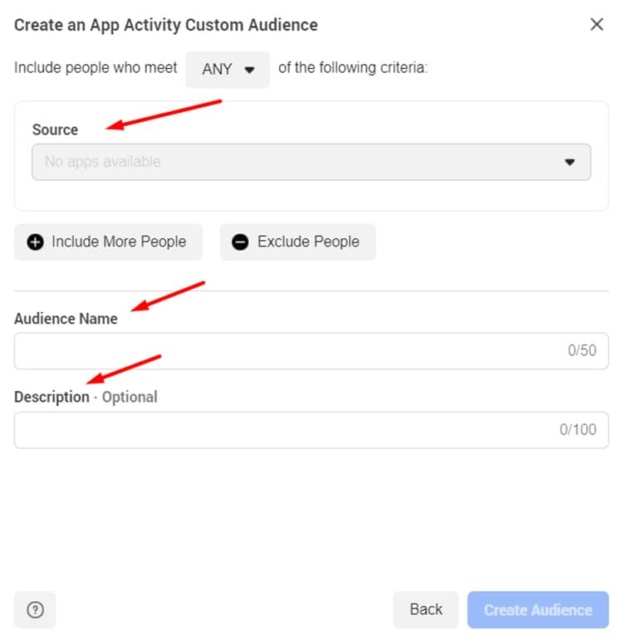
Source: the app you will use to get your information from.
If you see “no apps available, it means you haven’t registered your app with Facebook first. Here’s how to do it.
Once you’ve added your app, you can make your audience more specific based on different events, such as added payment info, purchase, etc.
Audience Name: give your audience a name.
Description: if you want to, you can also write a short description for your audience.
4. Create an Engagement Custom Audience
Remember, a Custom Audience made up of people who have interacted with your content across Facebook and its apps and services. There are eight engagement types (“Facebook Sources”) available, and we’ll go through creating Custom Audiences for each of them.
1. Video
This is a Custom Audience based on people who watched your video on Facebook or Instagram.
- Go to “Audiences” on your Ads Manager and click on “Create Audience.”
- Choose “Custom Audience.”
- Choose “Video.”
- Click on the dropdown menu next to “Engagement” and choose the type of viewers you want to use to create your audience.
- Then, under “Retention,” choose the number of days people will remain in your audience after they engage with your content. Maximum time: 365 days.
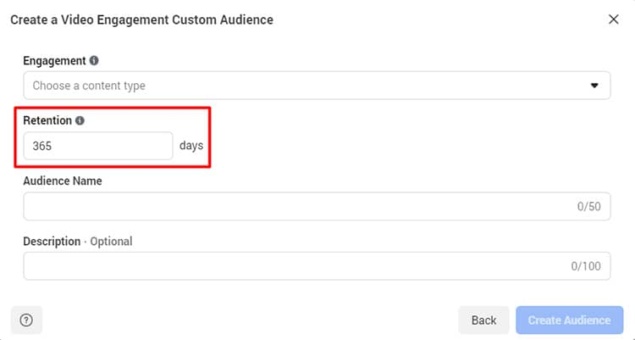
- Finally, give your Custom Audience a name and description.
2. Lead Form
This is a Custom Audience based on people who opened or completed a form in one of your lead generation ads on Facebook or Instagram.
- Go to “Audiences” on your Ads Manager and click on “Create Audience.”
- Choose “Custom Audience.”
- Choose “Lead Form.”
- Under “Events,” specify what kind of actions you want to include in your audience. You can choose from:
- Anyone who opened this form
- People who opened but didn’t submit form
- People who opened and submitted form
- Choose your Facebook “Page” and the “Lead Form” you want to get your information from.
- Then, under “Retention,” choose the number of days people will remain in your audience after they engage with your Lead Form. Maximum time: 90 days.
3. Instant Experience
This is a Custom Audience based on people who opened your Instant Experience on Facebook or Instagram.
- Go to “Audiences” on your Ads Manager and click on “Create Audience.”
- Choose “Custom Audience.”
- Choose “Instant Experience.”
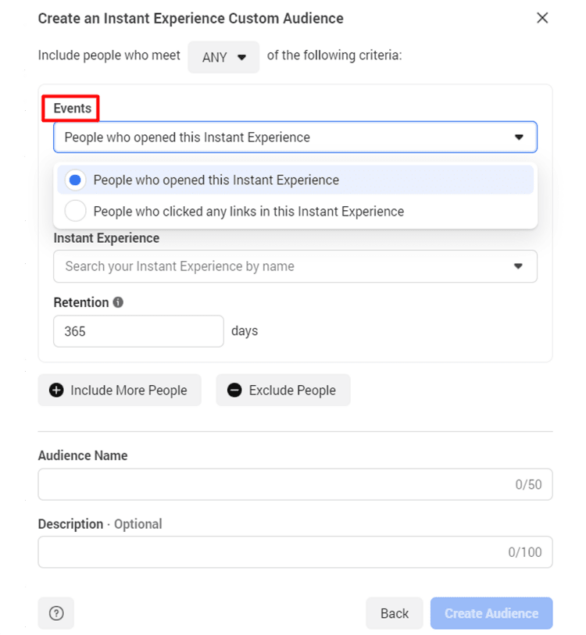
- Choose the experience you want to base your Custom Audience on.
- Give your audience a name and description.
4. Shopping
It’s a Custom Audience based on people who interacted with your products in a shopping experience on Facebook or Instagram.
- Go to “Audiences” on your Ads Manager and click on “Create Audience.”
- Choose “Custom Audience.”
- Choose “Shopping.”
- Choose your “Platform” (Facebook or Instagram).
- Choose the “Page” you want to use.
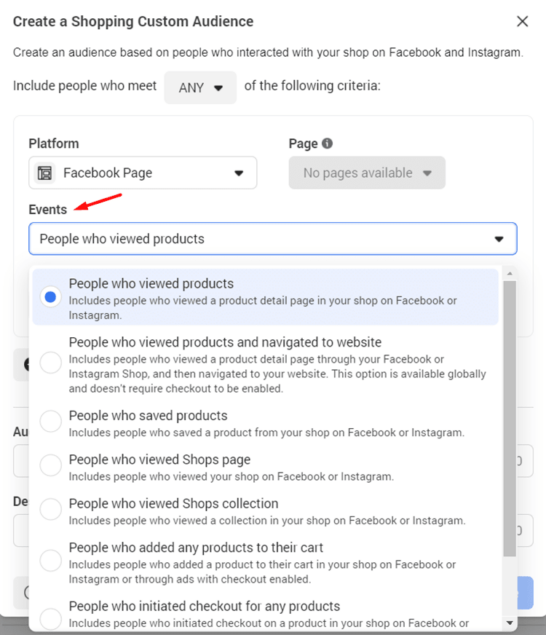
And choose the “Event” you want to base your Custom Audience on.
5. Instagram
It’s a Custom Audience based on people who visited or interacted with your Instagram profile, posts, or ads. You need to have a business or creator account to be able to create this audience.
- Go to “Audiences” on your Ads Manager and click on “Create Audience.”
- Choose “Custom Audience.”
- Choose “Instagram.”
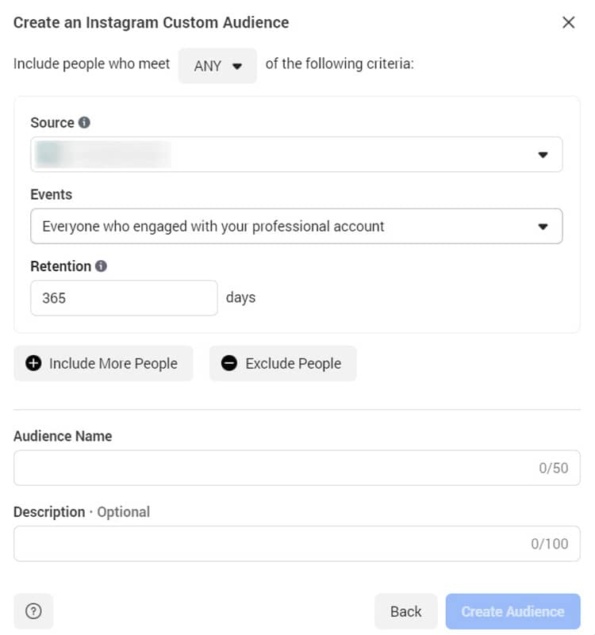
- Choose the “Event” you want to use for your Custom Audience.
- Then, under “Retention,” choose the number of days people will remain in your audience after they engage with your content. Maximum time: 365 days.
- Fill in your “Audience Name” and “Description.”
6. Events
It’s a Custom Audience based on people who interacted with one of your events on Facebook.
- Go to “Audiences” on your Ads Manager and click on “Create Audience.”
- Choose “Custom Audience.”
- Choose “Events.”
- Pick your “Segment.”
- Pick your Facebook “Page.”
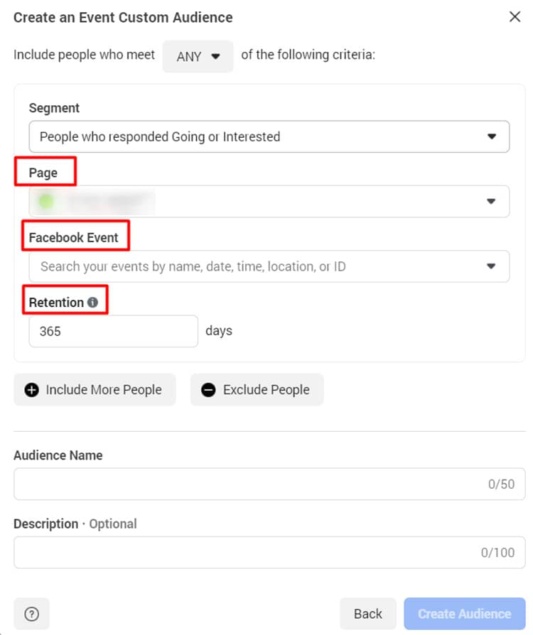
- Search specific events by name, dare, time, location, or ID.
- Under “Retention,” choose the number of days people will remain in your audience after they engage with your content. Maximum time: 365 days.
Give your Custom Audience a name and description, and you’re good to go!
7. Facebook Page
It’s a Custom Audience based on people who follow or have engaged with your Facebook Page.
- Go to “Audiences” on your Ads Manager and click on “Create Audience.”
- Choose “Custom Audience.”
- Choose “Facebook Page.”
- Then, pick the “Event” on which you want to base your Custom Audience.
- Under “Retention,” choose the number of days people will remain in your audience after they engage with your content. Maximum time: 365 days.
- Fill in your “Audience Name” and “Description” and you’re good to go!
8. On-Facebook Listings
This is a Custom Audience based on people who interacted with the on-Facebook listings from your catalog.
- Go to “Audiences” on your Ads Manager and click on “Create Audience.”
- Choose “Custom Audience.”
- Choose “On-Facebook Listings.”
- Choose your “Page.”
- In the “Events,” specify where you want to get your information from:
- People who viewed my products in my catalog.
- People who messaged about products in my catalog.
- Under “Retention,” choose the number of days people will remain in your audience after they engage with your content. Maximum time: 180 days.
- Give your audience a name and description.
5. Create an Offline Activity Custom Audience
If you have a physical store, you can also track how your customers interact with you offline and boost your Facebook targeting with this information. You can show ads to people on Facebook based on the actions they took offline.
To create an Offline Activity Custom Audience:
- First, you need to create an offline event set in Events Manager and link it with an ad account.
- Then, upload interaction data from your brick-and-mortar store to Events Manager.
- Go to “Audiences” on your Ads Manager and click on “Create Audience.”
- Choose “Custom Audience.”
- Choose “Offline Activity.”

- Choose “Offline Activity.”
- Select the source for your Custom Audience.
- Give your audience a name and description.
Use Custom Audiences to create Lookalike Audiences
Custom Audiences can also be used as a source audience for creating Lookalike Audiences. Lookalike Audiences are great because they can help you reach people who are similar to Facebook users who are most valuable to you.
So, once you’re done creating your Custom Audiences, you can go ahead and start setting up your Lookalike Audiences. Here’s how:
- Go to “Audiences” on your Ads Manager and click on “Create Audience.”
- Choose “Lookalike Audience.”
- Select the source Custom Audience.
- Select your audience size.
The bigger the percentage, the bigger your Lookalike Audience is going to be. However, keep in mind that it will be less precise, too.
TIP: Start with 1% Lookalike Audiences and gradually increase the percentage once you see that you need a bigger pool of potential customers.
Keep in mind that it may take around 6-24 hours for Facebook to create your Lookalike Audience. Also, your Lookalike Audiences are refreshed every 3-7 days.
Why it’s important to include and exclude Custom Audiences
You’ve probably noticed that when creating a Custom Audience, you can include or exclude people. Don’t skip this feature – you can save a lot of money by refining your Custom Audiences!
By excluding specific audiences, you can narrow down your Custom Audience to a group of people to whom your particular ad campaign will be highly relevant. This will help you to refine your targeting and increase your conversion rate. Your cost per conversion will be smaller, too. For example, you can exclude your recent customers or exclude people you target with a different ad campaign.
3 Examples of Custom Audiences to start with
Now you know how to create all types of Facebook Custom Audiences. With so many choices, you may be feeling a bit confused about where to start from. Don’t worry, we’ve got you covered! Below, you’ll find a couple of ideas for audiences that convert.
- People who abandoned their carts
If you already have website visitors, chances are you have cart abandoners, too. These are the people who added something to their carts but left your store without completing the purchase. This is a great bunch of users to show your ads to as they might only need a little push to buy what they wanted from you. For example, you could target them with an ad “only a few items left,” creating personalized creatives for different product pages.
PRO TIP: Make sure to exclude purchasers not to waste your ad money.
- People who engaged with your Instagram page
If you’re putting a lot of effort into posting creative content on your Instagram page, chances are you’ve reached quite a few potential customers. Create a Custom Audience to target people who have interacted with your Instagram content or follow your page. They’ve warmed up to your business and may be ready to become your customers.
- People who visited your website in the past 30 days
Since you’ll be targeting all of your website visitors, it’s a good idea to keep your ad messaging broad, especially if you’re selling multiple products. This way, your ad will be relevant to all of your visitors.
If you want to go for a more personalized ad creative, create Custom Audiences for different landing pages. However, keep in mind that you need to have a high traffic volume if you want to segment your targeting – Facebook needs enough users in your audiences to optimize your ad delivery.
FAQ
What are the types of Custom Audiences?
You can create five types of Facebook Custom Audiences: Website Custom Audiences, App Activity Custom Audience, Customer List Custom Audience, Offline Activity Custom Audience, and Engagement Custom Audiences. The latter can be subdivided into eight more categories: Video, Lead form, Instant Experience, Shopping, Instagram account, Events, Facebook Page, and On-Facebook Listings. So, in total, there are twelve types of Custom Audiences you can use in your ad campaigns.
How do you create a Custom Audience on Facebook?
If you want to create a Facebook Custom Audience, you need to open your Facebook Ads Manager and click on the Audiences section. Then, select Create Audience and pick Custom Audience from the dropdown menu. You can create twelve different types of Custom Audiences based on such sources as your Customer list or your Facebook page engagement.
How do I edit my Custom Audience on Facebook?
To edit your existing Custom Audience on Facebook, follow these steps:
- Go to your Audience Insights.
- If you have more than one ad account, from the drop-down at the top of the page, select the one where your audience is saved.
- Click Open.
- Select your Custom Audience you want to edit and click Open.
- Use the filters to edit your audience.
- Click Save.
Keep in mind that you can’t edit an audience used in an active campaign.
Why can’t I create a Custom Audience on Facebook?
If you can’t create a Custom Audience on Facebook, it may mean several things. For example, your Facebook account may have been flagged by Facebook, or you may not be the admin of your Facebook ad account. Also, it’s possible that you haven’t accepted Facebook Custom Audience Terms.


