Running Facebook ads without the Facebook pixel on your Shopify store is the same as knowing where the hidden treasure chest is and not going for it. It’s just not wise.
The Facebook pixel can help you boost your sales by measuring, optimizing, and building targeted audiences for your ads. To make it happen, you need to add a piece of tracking code to your Shopify store.
Adding the Facebook pixel may seem a little tedious or even intimidating, though. When did the words “add some code to your website” ever sounded like a fun thing to do?
But here, at sixads, we aim for things easy. That’s why we created this step-by-step guide to help you install the Facebook pixel to your Shopify store.
So, go make yourself a nice cuppa, follow the steps below, and by the end of this article, you’ll have added a brand new Facebook pixel code to your site.
You’ll also find 7 tips on how to use your Facebook pixel to increase your conversions. No more money wasted on underperforming ads!
First, let’s quickly go over the basics.
What is the Facebook Pixel?
The Facebook pixel is a piece of tracking code that you need to copy into your Shopify store’s header section. This code then sends Facebook information about the actions of your website visitors.
Why is it important?
When you can track the actions on your store, you can build better-targeted audiences and ensure that you show your ads to the right people. This means you’re more likely to get sales!
Here are some of the actions (also called ‘standard events’) that you can track:
- Add payment info
- Add to cart
- Add to wishlist
- Search (e.g., product search on your website)
- Purchase
- And many more!
You can find all the events here.
How to create a Facebook pixel for a Shopify store
First, make sure you fulfill these two requirements:
- You have a Shopify store (or any website for that matter).
- You can update your website’s code.
Qualify for both? Good, then let’s create a Facebook pixel for your Shopify store.
- Go to your Events Manager.
- Click on the green plus Connect Data Sources.
- Choose Web.
- Select Facebook Pixel and click Connect.
- Click Continue.
- This window will pop up, asking you to name your pixel.
If you have several Shopify stores, give your pixel an indicative name.
- You also have an option to enter your website URL – do it! Since Shopify is one of Facebook’s integration partners, it offers an easy setup method.
That’s it! You’ve created your Facebook pixel.
Where can I find my Facebook pixel?
Once you’ve created your Facebook pixel, find it here in a few clicks:
- Go to your Events Manager.
- Select your Business Account.
- Under Data Sources, select your Facebook pixel ID.
3 ways how to add a Facebook pixel to your Shopify store
There are three ways how you can set up the Facebook pixel on your Shopify store:
- Use Shopify integration;
- Add the Facebook pixel code manually;
- Ask your web developer to do it.
Let’s go step-by-step through them all.
1. Add the Facebook pixel using a Shopify integration
This is probably the easiest way for Shopify store owners.
- Go to your Shopify admin and click Facebook in the Sales channel section.
- Click Settings, and click Data sharing settings.
- Navigate to the Customer data-sharing section and click the Enable data-sharing toggle.
- Then, in the Choose data-sharing level section, select Standard, Enhanced, or Maximum.
- Select your pixel from the list.
- Click Confirm, and you’re done.
2. Add the Facebook pixel to Shopify manually
If you’re a little familiar with HTML and want to do things yourself, here’s how to add the Facebook pixel code to your website.
- Go to your Events Manager.
- Select your pixel that you want to add.
- Click Continue Pixel Setup.
- Choose Install code manually.
- Copy the Facebook pixel code.
- Find the header of your Shopify store:
- Look for <head> </head> in your code or
- Locate the header template in your CMS or web platform.
- Paste the Facebook pixel code after <head> and before </head>, so it would be in the middle of the header code:
That’s it!
2. Ask a developer to install the Facebook pixel code to your Shopify store
Finally, if you have a web developer taking care of your Shopify store, you can ask him or her to install the Facebook pixel for you. Here’s how:
- Go to Events Manager.
- Choose the pixel you want to add.
- Click Continue Pixel Setup.
- Choose Email Instructions.
- Enter your web developer’s email address.
- Click Send.
Once you’ve added your Facebook pixel, use the Facebook Pixel Helper to see if your Facebook pixel is working. You can find it here.
Use Facebook pixel helper to troubleshoot errors and work on your pixel’s performance.
Create the first events for your Facebook pixel
Now that you have your Facebook pixel added, it’s time to put it to work! You need to set up events.
Events are actions that happen on your online store, such as making a purchase or adding something to a cart.
Your Facebook pixel will track these actions and report them to your Facebook pixel page in your Events Manager. You’ll be able to use this information to target the right people with your ads.
You can set up your events by manually installing the code or by using the event setup tool.
There are two categories of events:
- Standard events
- Custom events
Standard events
Standard events are common website visitor actions, such as searching, viewing, or purchasing a product. Your Facebook pixel tracks them to help you understand how your potential customers interact with your website.
Facebook has a predefined list of standard events that are recognized and supported across its ad products. You can use standard events to optimize your ads for conversions and build targeted audiences. Learn more about setting up standard events here.
Here are some of the most common standard events:
- Add payment info: Tracks when your online store visitors enter their payment information during a checkout process.
- Add to wishlist: Tracks when your visitors add items to a wishlist.
- Add to cart: Fires when someone adds an item to a shopping cart.
- Contact. Captures any type of contact between your visitor and your business (telephone, SMS, email, chat, etc.).
- Search: Tracks searches performed on your Shopify store.
- Purchase: Gathers information on completed purchases.
- Initiate checkout: Tracks when someone clicks on a checkout button.
You can find the complete list of standard events and the parameters they support here.
Custom events
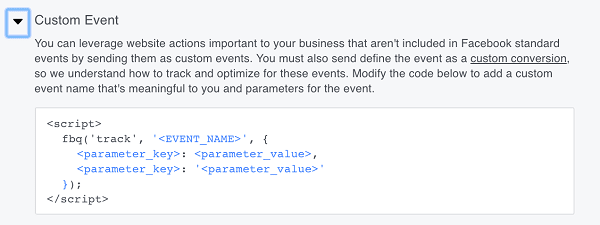
Custom events refer to actions that don’t fall inside the scope of standard events. You can set them with a unique name that will represent your wanted action. Use custom events to build Custom Audiences.
If you want to use custom events for optimization or attribution, map them to a custom conversion. Then, you can choose which standard event the custom conversion should be optimized for.
Custom conversions
With custom conversions, you can create rules for URLs or events. These rules then allow you to measure specific customer actions.
For instance, you can filter all ‘add to cart’ events to measure only the ones that include men’s shoes over $150. You can then run highly targeted ads to encourage people to finish their purchases. You can also adapt your ad creative to better match your target audience.
Here’s how your Shopify store’s code will look with standard or custom events added:
Use events to understand your customers’ journey
You can set up events along every step of your visitors’ path. For example, you can track your customers from the moment they view a product page to making a purchase. Once you can map your customers’ journey, you can run targeted ads that help move your Shopify store’s visitors down your marketing funnel and maximize your sales.
7 tips to boost your conversions with Facebook pixel
Read the tips below to learn how to use Facebook pixel for your Shopify store to get the most of it, a.k.a, make as many sales as possible!
1. Create Custom Audiences
One of the best things about having a Facebook pixel is creating Custom Audiences from your website traffic.
A custom audience lets you reconnect with people who have engaged with your Shopify store. It’s probably the most effective form of targeting on Facebook since you target people who are already in your sales funnel and are more likely to convert.
You can use Custom Audiences for two reasons:
- To run retargeting ads;
- To use them as a source for creating Lookalike Audiences.
2 types of Custom Audiences to begin with:
Not sure where to start? Retarget your potential customers. These two types of Custom Audiences never fails:
- Cart abandoners
Create a Custom Audience based on people who abandoned their carts. These people were closed to making a purchase, but something got in the way.
Maybe some of them couldn’t find their credit cards and decided to finish the payment later but never got to it. Others could have gotten distracted by something at home. Maybe the shipping price discouraged them. Whatever the reason, these people were close to buying from you and may only need a little push to convert.
For instance, you could run an ad campaign that plays on the fear of missing out. Your ad could say that there are only a few items left, so they better hurry. Or you could offer a small discount or free shipping.
- Your Shopify store visitors in the past 30 days
Another classical Custom Audience consists of people who visited your Shopify store in the last 30 days. You’ll be running an ad campaign for all website visitors, so it’s best if your ad messaging is broad. However, if you want to create more personalized ads, you can segment your target website visitors and target separate product pages.
Check this article to learn how to create a Facebook Custom Audience.
2. Create Lookalike Audiences
The second main advantage of Custom Audiences is that you can use them as a source to create Lookalike Audiences
Lookalike Audiences let you reach people who are similar to people who have already bought from you or have engaged with your business in other ways, such as visiting your website.
When creating a Lookalike Audience, you’ll have to select your Audience Size:
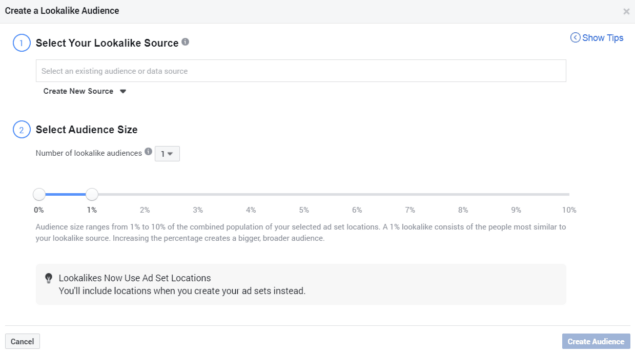
The smaller the percentage, the smaller but more precise your Lookalike Audience is going to be.
Our suggestion is to start with 1% to target people who will most likely buy from you.
Then, once you see that you need more people in your marketing funnel, gradually increase the percentage. Your Lookalike Audience will be less precise, but you’ll cover a bigger pool of potential customers.
3. Run Dynamic product ads
Facebook dynamic ads let you run personalized product ads automatically. They allow you to retarget your website visitors with ads that show the products they were interested in but got distracted or just didn’t have the time to finalize the purchase.
These ads are especially great for those new to advertising since you don’t need to put in a lot of manual work.
To run dynamic ads, upload your product catalog to your Facebook Business Manager. Make sure you’ve included all the products that you want to run ads for. Then, your Facebook pixel events will be matched with the products from your catalog to show dynamic ads to the right people.

You can choose from three different formats for dynamic ads:
- Carousel – show up to 10 images in one ad;
- Single image – traditional image ad;
- Collection ad – a grid-like layout ad that features a primary image or video and has four smaller images below.
4. Set up custom conversions
Remember how we discussed standard and custom events a bit earlier in the article? With custom conversions, you can measure more specific actions than a usual standard event allows you to.
The Facebook pixel lets you set up rules for events or URLs that can help you filter purchases or other conversions.
For example, if you want to target women who are likely to spend more on dresses, you can filter your purchases to measure only the ones of women’s dresses over $50. Then, once you have enough pixel events for such custom conversions, you can use them to optimize your ad delivery and target women who are most likely to pay such a price for a dress.
5. Use Facebook conversion tracking
Another way how you can use the Facebook pixel to boost your sales is to track the actions of your online store visitors. It’s called conversion tracking.
You can use your tracked conversions to calculate your return on ad investment. Conversion tracking can also be used to create custom audiences and dynamic ads.
You can use the Facebook pixel to track conversions in three ways:
- Standard events
- Custom events
- Custom conversions
Learn more about how to track conversions here.
What’s really cool about conversion tracking is that you can see cross-device conversions. In other words, Facebook tracks how your customers move down your sales funnel across apps and the web. For example, you can monitor how a customer saw your ad on their desktop computer but bought it later using their mobile phone.
You can find your tracked conversions in your Facebook Ads Manager.
6. Track conversions from iOS 14 devices with API
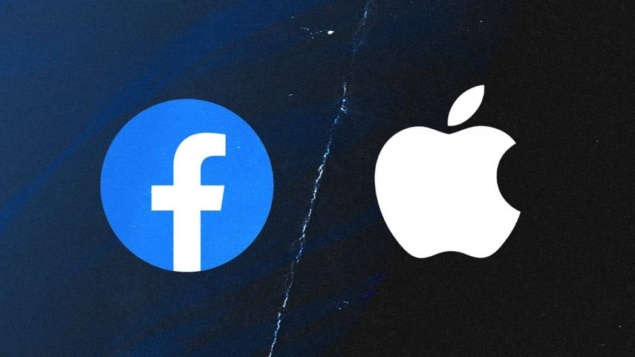
Have you heard about how the Apple iOS 14 release may affect your ads and reporting?
With iOS 14, apps in the App Store that track their users will have to show a prompt to iOS 14 users. If people opt out of tracking on their devices, your ads’ personalization and reporting will be limited.
To help deal with these changes, Facebook has come up with a solution to process the Facebook pixel conversions from iOS 14 devices. It’s called Aggregated Event Measurement (API). Instead of collecting information from cookies a
Aggregated Event Measurement will let you measure up to 8 conversion events per domain. This means you’ll have to prioritize your events to see which ones are the most essential for your business. You can learn more about event configuration here.
7. Get enough events
Finally, make sure you’re getting enough traffic to your Shopify store. This may seem like a no-brainer, but often beginner advertisers jump to conclusions about their ads’ performance and the best structure for their campaigns a bit too soon.
For example, if 10 people out of 30 add something to a cart after they’ve visited your product page, technically, your conversion rate is around 33%. However, are 10 events really enough to make decisions on your future ad campaigns? Probably not.
Before you start creating your advertising strategies, make sure you have enough events on your Facebook pixel.
How many events are enough?
According to Facebook, you need at least 100 people to create a source audience for your ads. So, technically, you can start with 100 events. However, the more events you’ll have, the more statistically accurate your results will be. Ideally, you should have 500-1000 events to give Facebook enough data to build audiences based on your events.
Check our tips and tricks to driving traffic to a Shopify store for ideas on how to get enough events.
How to delete my Facebook pixel from Shopify?
It could be the case that you had already installed a Facebook pixel a while ago, and now you want to add a new one. In this case, you’ll have to remove your old pixel first to make sure there are no duplicate data.
To delete your Facebook pixel from your Shopify store, follow these steps:
- Go to your Shopify admin and click ‘Facebook.’
- Click ‘Settings.’
- Navigate to the ‘Data sharing settings’ section and click ‘Disconnect.’
You may still have the pixel code in your theme.liquid file. Make sure you remove it from there, too:
- Go to your Shopify account and click ‘Online store’ → ‘Themes.’
- Find the ‘Current theme’ section, click ‘Actions,’ and choose ‘Edit code.’
- Open the code editor by clicking on the ‘theme.liquid’ file.
- Locate your Facebook pixel code between the <head> and </head> tags and delete it.
- Make sure to click ‘Save.’
That’s it!
FAQ
Should I add the Facebook pixel to Shopify?
Yes. The Facebook pixel will help you to track the actions on your Shopify store and build super-targeted audiences. You’ll be sure that your ads are shown to the right people and you. The Facebook pixel will give you a lot of customer data that you’ll be able to use to your advantage to maximize your sales.
Can you add the Facebook pixel to Shopify?
Yes, you can add the Facebook pixel to your Shopify store. There are three ways to do it. You can add the Facebook pixel to Shopify manually, use Shopify’s partner integration, or email instructions to your web developer.
How to create a Facebook pixel?
Follow these steps to create your Facebook pixel:
- Navigate to your Events Manager.
- Click on Connect Data Sources and choose Web.
- Select Facebook Pixel and click Connect.
- Give your pixel an indicative name
- Enter your website URL to explore easy setup options for a Shopify store
- Click Continue to finish the creation of your pixel.
How to find my Facebook pixel id?
To find your Facebook pixel id, go to your Events Manager and select your Business Account. Under Data Sources, look for the number that starts with ID.
Where is the Facebook pixel on Shopify?
Go to your Shopify admin page. On the left, under the ‘Sales Channels’ column, click on ‘Online Store’, and then on ‘Preferences.’ Then, scroll down until you spot a section ‘Facebook Pixel.’ There you can connect your pixel with the Facebook app.
How do I add a Facebook pixel to Shopify in 2022?
Once you’ve created your Facebook pixel, open your Shopify store’s admin page. Under the Sales channels section, click ‘Facebook’. Then, click ‘Settings’ and go to ‘Data sharing settings.’ In the Customer data-sharing section, click the ‘Enable data-sharing’ toggle. After, in the Choose data-sharing level section, select Standard, Enhanced, or Maximum. You’ll see a list – select your pixel from it, click ‘Confirm,’ and your pixel will be added.


